 Learn to control an image’s contrast and exposure in iPhoto
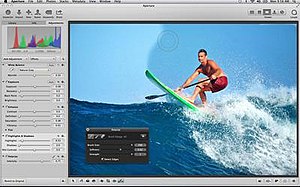
Getting to know an image’s histogram is something every keen photographer should look to do. What these mountainous graphs show us is the distribution of light and colour in an image. They show us the vital statistics of an image, and whether or not it’s been over- or underexposed. By controlling the histogram in iPhoto, we can improve the contrast, shadow detail and brightness of an image very effectively.
Mainly, it’s a matter of assessing what the histogram is telling us about the image, and then applying the appropriate edits. If there are any peaks falling outside of the histogram then this indicates a loss of visible texture and detail, which is something best avoided. Follow these easy steps to create better images in no time at all.
Step-by-step Fine-tune the histogram
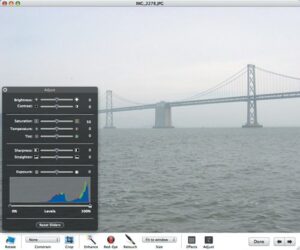
1 Inside iPhoto
If you think your image is suffering, you can view a histogram to show exactly what’s happening. Open up your image into iPhoto and click on the Edit button to begin.
2 Too bright!
At the top of the Adjust menu is a histogram. As it reveals, this image is overexposed in regions of blue and green. If you pull the far right pointer inwards, your image will become even brighter.
3 Just right
To fix over-exposure, adjust the midtones by sliding its pointer to the right. Notice that details gradually return to brighter areas of the image. Too far and the image goes dark.
4 Assess the histogram
Histograms can be used to not only fix overexposure but also boost contrast. If most of the peaks are clumped in the centre, then your whites aren’t white and blacks not black.
5 Darker shadows
To increase the contrast, slide the far left pointer inwards until it reaches the first couple of peaks. This helps to deepen shadows. Anything inside the dark grey area has no details.
6 Brighter highlights
Increase contrast by sliding the far right pointer inwards until it reaches the first peak. You should see a dramatic difference between the original image and the now more vibrant exposure.
7 What’s happening?
If your image has a dull exposure, then the Histogram will show flatter peaks, and more lower peaks. We can instantly see that not all the pointers align with the histogram’s main parts.
8 A brighter day
Starting with the outer pointers, slide the far right one inwards to brighten the highlights. Line it up with the beginning of the first peak you come across in the histogram.
9 Focus on midtones
Finally, slide the middle pointer to the left. This controls the midtones of the exposure, and will make the image appear much brighter. Over all, exposure is dramatically improved.